The Industrial Metrology Business Unit of the global Nikon Corporation, which manufactures the most advanced Laser Radar equipment on the market for taking precise, non-contact measurements in manufacturing environments, has teamed up with US-based integrator Variation Reduction Solutions Inc (VRSI) to realise the most advanced system on the market for quality control of vehicle on wheels (VoW) on moving production lines.
In this blog, Nikon Laser Radar Global Product Manager, Paul Lightowler explains the issues involved in the automotive industry and why APDIS Gap & Flush is the way forward to ensure every vehicle on the forecourt appears perfect.
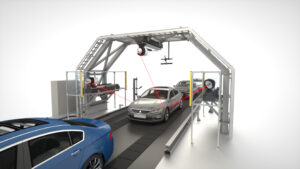
Within vehicle manufacturing, quality control is essential to maintain geometrical precision of parts and components during assembly as the vehicle is slowly assembled from a collection of metal, plastic, glass and other materials. By carefully controlling the quality, the manufacturer ensures that all of the components fit together as intended to produce a functional, safe and consistent vehicle for the customer.
As far as the potential buyer is concerned, all they see is a shiny, colourful exterior and plush interior, but humans have the wondrous ability to pick out certain details that can have an impact on their perception of the quality of the vehicle and the brand.
In this case, I am talking about the gaps and flushness of the exterior panels and closures. The human eye can determine quickly whether lines are parallel or not; fingers can detect whether two surfaces are level; ears can discern the different sounds of a door closing or wind noise when driving.
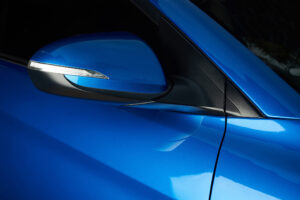
Whilst an uneven gap or panel misalignment might not have any adverse effect on vehicle performance regarding acceleration, braking, handling, or other general driving, it is one of the first things that a customer notices even before getting in the car and turning the engine on. Combine this with the more direct impacts of poor door alignment or panel fit, namely leaks, squeaks or excessive wear, and it becomes obvious why automotive manufacturers are keen to have some sort of control over this gap & flush.
So, what can they do? Good general process control throughout the build will always help to minimise problems at the end of the line, but the ultimate test is the final vehicle once fully assembled. An efficient way to measure, record and feed back this final quality control information is required.
There are several challenges to measuring gap & flush details at this final assembly stage however:
• The vehicle is finished, with a fancy paint job. Marking, scratching or otherwise damaging the panels at this stage is a definite ‘no’.
• The vehicle is often moving. Final assembly lines typically are constantly moving conveyors, making any measurement difficult and inspection times short.
• External references are limited. Modern vehicles are deliberately designed to have smooth, flowing curves and almost featureless bodywork. This makes determining where measurements should be taken quite difficult.
• Final assembly lines are busy places. Typically, several operations are taking place as the vehicle moves down the line, most of which are still manual. Automating measurements safely in this environment is a priority.
Automating this inspection process is notoriously difficult due to the above challenges, and robots seem to be an obvious choice but bring with them their own issues:
• Safety considerations around the measurement area
• Tracking of the conveyor to synchronize movement
• Complicated installation, programming, and maintenance
• Short standoff sensors meaning close robot movement to the vehicle and potential for accidental damage
• Reach issues particularly at the front, rear and roof line
• Recovery when failures occur, both in time to reset the line and in money to repair sensors and vehicles if collisions happen
Cobots may reduce the safety requirements somewhat, but reach is generally more limited, and the sensors still have a short standoff, so is there a way of automating without the robots, short standoffs, complicated programming, and safety concerns? In short, yes!
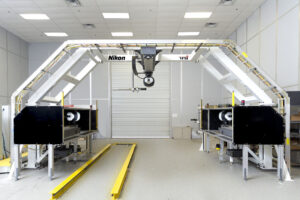
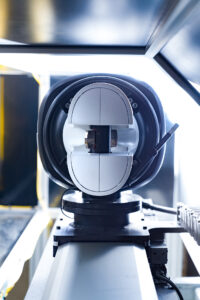
The new APDIS Gap & Flush System is specifically designed to overcome the limitations of robot-based solutions by utilising the power of the APDIS Laser Radar. With its large volume and accurate laser-based measurement, large stand-off measurements can be taken, and movement synchronisation can be reduced to a single linear axis, simplifying measurements, and reducing safety requirements considerably.
The APDIS Gap & Flush system developed in cooperation with VRSI provides comprehensive vehicle coverage with three Laser Radars for vehicles large and small. With direct vehicle tracking, no conveyor interlocks are required, and simple linear axes move the Laser Radars synchronously with the vehicle, allowing fast and repeatable measurements of gaps and flushes all around the vehicle at multiple positions (up to 170 locations) at a range of conveyor speeds (up to 140mm/s).
Safety enclosures and light screens ensure the Laser Radars are protected without encroaching on the measurement area, allowing a compact installation space without the need for robot-style safety fencing and interlocks. The safety of the vehicle is also ensured due to the large separation between the Laser Radars and the vehicle, meaning that collisions and line stoppages can never happen during normal operation, even if a problem occurs and the system fails.
Working with VRSI, which has extensive knowledge of Laser Radar technology and of the automotive industry, has allowed Nikon to exploit the capabilities of this non-contact metrology solution to tackle a traditionally very difficult application – Gap & Flush.
Ray Carozza, Exec VP Sales VRSI states, “Leveraging our experience in the automotive market with Nikon’s technology and metrology experience has produced an innovative solution for end-of-line, moving-line, gap & flush measurement that is far superior to anything else on the market”.
